 Welcome To Openworld FlashPresenter Welcome To Openworld FlashPresenter
 Samples Gallery Samples Gallery
 Download Download
 Download Openworld FlashPresenter Now! Download Openworld FlashPresenter Now!
 Overview Overview
 Openworld FlashPresenter Features Openworld FlashPresenter Features
 Getting Started with Openworld FlashPresenter Getting Started with Openworld FlashPresenter
 Your Presentation Screen Your Presentation Screen
 PowerPoint Import PowerPoint Import
 PowerPoint Import Wizard PowerPoint Import Wizard
 Step 1 - Open Presentation Step 1 - Open Presentation
 Step 2 - PowerPoint Slide Narration Step 2 - PowerPoint Slide Narration
 Step 3 - Narration Results Step 3 - Narration Results
 PowerPoint Import Preferences PowerPoint Import Preferences
 Creating New Presentation Creating New Presentation
 Getting Started Getting Started
 Video Setup Video Setup
 Video Encoding Setup Video Encoding Setup
 Transcript Setup Transcript Setup
 Slides Setup Slides Setup
 Media Synchronization Media Synchronization
 Synchronization Overview Synchronization Overview
 Editing Transcript Editing Transcript
 Synchronizing the Transcript Synchronizing the Transcript
 Contents Creation Contents Creation
 Synchronizing Slides Synchronizing Slides
 Synchronizing Speakers Synchronizing Speakers
 Hyperlinks and Resources Links Creation Hyperlinks and Resources Links Creation
 Synchronizing Hyperlinks and Resources Links Synchronizing Hyperlinks and Resources Links
 Glossary Building Glossary Building
 Creating Quizzes Creating Quizzes
 New Quiz Creation New Quiz Creation
 Quiz Properties Setup Quiz Properties Setup
 Quiz Customization Quiz Customization
 Quiz Results Processing Quiz Results Processing
 Presentation Export Presentation Export
 Exporting Your Presentation Exporting Your Presentation
 Using HTTP Streaming technology for video/audio Using HTTP Streaming technology for video/audio
delivery
 Flash Media Server Flash Media Server
Configuration Basics
 Accompanying Tools Accompanying Tools
 Video Converter Video Converter
 Video Joiner Video Joiner
 Video Encoding Preferences Video Encoding Preferences
 MP3 To FLV Converter MP3 To FLV Converter
 MP3 Compressor MP3 Compressor
 Audio Uncompressor Audio Uncompressor
 MP3 Sound Recorder MP3 Sound Recorder
 Support Support
 DEMO Mode Limitations DEMO Mode Limitations
 Software Activation and Order Information Software Activation and Order Information
 Contact Information Contact Information
 Credits Credits
|
|
Quiz Properties Setup
How to edit quiz properties:
Since a question title has been initialized, the next step is to assign the quiz's and question's properties.
First, choose one of the following tabsheets at the Quiz Properties panel: "Quiz", "Question" or "Results".
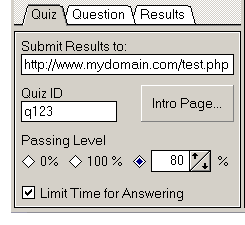
1. Set the following items at the "Quiz" tabsheet:

 Submit Results to: Type the URL here where the script is located, which will process the testing results and return the resolution to continue the learning process. Leave this field blank, if you do not wish to process the quiz results. Submit Results to: Type the URL here where the script is located, which will process the testing results and return the resolution to continue the learning process. Leave this field blank, if you do not wish to process the quiz results.
 Quiz ID: Type the Quiz ID here. Quiz ID identifies this quiz in your learning management system. Leave this field blank if the field above is blank. Quiz ID: Type the Quiz ID here. Quiz ID identifies this quiz in your learning management system. Leave this field blank if the field above is blank.
 Intro Page: Click here to edit the text, appearing at the introductory screen of the quiz. This screen may contain any instructions for testee or just "Welcome" message. Intro Page: Click here to edit the text, appearing at the introductory screen of the quiz. This screen may contain any instructions for testee or just "Welcome" message.
 Passing Level: Set the value of passing level for the quiz. Passing Level is the minimal ratio of testee's score to the sum of points for all questions in the quiz (percentage), which lets testee continue learning process after testing. Passing Level: Set the value of passing level for the quiz. Passing Level is the minimal ratio of testee's score to the sum of points for all questions in the quiz (percentage), which lets testee continue learning process after testing.
 Limit Time for Answering: Set this check box if you wish to limit test in time. You can assign individual time for each question, using Question Time field, located at the Question tabsheet. Limit Time for Answering: Set this check box if you wish to limit test in time. You can assign individual time for each question, using Question Time field, located at the Question tabsheet.

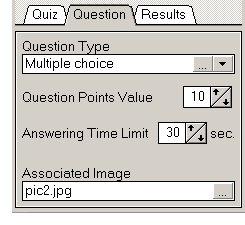
2. Set the following items at the "Question" tabsheet:
 Question Type: Choose the question type using the rightmost "arrow" button of the question type selector.
There are several question types: Question Type: Choose the question type using the rightmost "arrow" button of the question type selector.
There are several question types:
 True/False: Lets testee choose one of two possible answers to the question, like "Yes" or "No". True/False: Lets testee choose one of two possible answers to the question, like "Yes" or "No".
 Multiple Choice: Lets testee choose one possible correct answer among several options. Multiple Choice: Lets testee choose one possible correct answer among several options.
 Multiple Response: Lets testee choose one or more correct answer(s) among several options.
You can set an option in the Question Editor for this question type to add correct points to testee score for each correct answer chosen.
Otherwise correct points will be added if testee will find all correct answers to the question. Multiple Response: Lets testee choose one or more correct answer(s) among several options.
You can set an option in the Question Editor for this question type to add correct points to testee score for each correct answer chosen.
Otherwise correct points will be added if testee will find all correct answers to the question.
 Fill in the Blank: Lets testee fill out one text input field with the answer. This answer will be compared with some predefined correct answers. The answer is correct if it coinsides with one of predefined correct answers. Predefined answers are invisible to testee during answering. Fill in the Blank: Lets testee fill out one text input field with the answer. This answer will be compared with some predefined correct answers. The answer is correct if it coinsides with one of predefined correct answers. Predefined answers are invisible to testee during answering.
 Free Text: Lets testee fill out the textbox with some text. No points are added for answer to such question type.
This question type has no time limit for answering. Such question type usually serves as a feedback or a way to get free-formed user response. Free Text: Lets testee fill out the textbox with some text. No points are added for answer to such question type.
This question type has no time limit for answering. Such question type usually serves as a feedback or a way to get free-formed user response.
 Question Editing: You can edit the question clicking the "..." button at left from the question type selector button.
The Question Editor dialog is opened, where you can assign the question text, the answer options, assign the correct answer(s). You can add and remove answer options when it is possible. Question Editing: You can edit the question clicking the "..." button at left from the question type selector button.
The Question Editor dialog is opened, where you can assign the question text, the answer options, assign the correct answer(s). You can add and remove answer options when it is possible.
 Question Point Value: Assigned value will be added to testee's score for correct answer to each question. Point value can be set individually for each question within the quiz. Question Point Value: Assigned value will be added to testee's score for correct answer to each question. Point value can be set individually for each question within the quiz.
 Answering Time Limit: Set the limit of time for a question. Question will expire on this time and the answer will be considered as incorrect. Answering Time Limit: Set the limit of time for a question. Question will expire on this time and the answer will be considered as incorrect.
 Associated Image: Every question type but "Free Text" can have associated picture, which will be shown together with the question. In this way it is possible to ask a questions in "graphic form", like "What is it?". Image file can be in JPEG, PNG or GIF format. Associated Image: Every question type but "Free Text" can have associated picture, which will be shown together with the question. In this way it is possible to ask a questions in "graphic form", like "What is it?". Image file can be in JPEG, PNG or GIF format.
3. Set the following items at the "Results" tabsheet:
 Show Question Point Values: Question "weight" will be shown at each question page. Show Question Point Values: Question "weight" will be shown at each question page.
 Show Score Points: Score points will be shown as at each question page as at the Quiz Results page. Show Score Points: Score points will be shown as at each question page as at the Quiz Results page.
 Show Passing Points: Passing Points will be shown at the Quiz Results page. Show Passing Points: Passing Points will be shown at the Quiz Results page.
 Ask User ID: User ID input field will be shown at the Quiz Results page. User ID is used to identify the testee in your Learning Management System.
User ID is used only if "Submit Results to" field (see above) is not empty. Ask User ID: User ID input field will be shown at the Quiz Results page. User ID is used to identify the testee in your Learning Management System.
User ID is used only if "Submit Results to" field (see above) is not empty.
 On Success Skip To: You must define, where your presentation's playback position will be moved to in the successful result of testing.
It is possible to choose the position pointer type from the next categories: On Success Skip To: You must define, where your presentation's playback position will be moved to in the successful result of testing.
It is possible to choose the position pointer type from the next categories:
 Topics Topics
 Slides Slides
 Links Links
 Resources Resources
 Time Markers Time Markers
Use the rightmost "arrow" button to select the category.
After that it is possible to assign the required position using the "..." button located at left from the "arrow" button.
 On Failure Skip To: You must define the "Failure Position" in a way, identical to the described above for successful result of testing. On Failure Skip To: You must define the "Failure Position" in a way, identical to the described above for successful result of testing.
IMPORTANT! It is assumed, that "failure" position is located at some time position before quiz location, and the "successful" position is located at some time position after quiz location in the transcript.
Your presentation will not work correctly, if this rule is not kept.
After the quiz and questions properties are set you can insert the quiz into transcript to set the time position for the quiz.
See previous page for details.
|


 Quiz Properties Setup
 Submit Results to: Type the URL here where the script is located, which will process the testing results and return the resolution to continue the learning process. Leave this field blank, if you do not wish to process the quiz results.